ISPRS-Potsdam

The Potsdam dataset is for urban semantic segmentation used in the 2D Semantic Labeling Contest - Potsdam.

The dataset can be requested at the challenge homepage. You need to get a package file named utf-8' 'Potsdam.zip (size: 13.3GB), and unzip this package to get a folder named Potsdam which contains 10 files as follows:

1
2
3
4
5
6
7
8
9
10
11
Potsdam
├── 1_DSM.rar
├── 1_DSM_normalisation.zip
├── 2_Ortho_RGB.zip <--
├── 3_Ortho_IRRG.zip
├── 4_Ortho_RGBIR.zip
├── 5_Labels_all.zip <--
├── 5_Labels_all_noBoundary.zip <--
├── 5_Labels_for_participants.zip
├── 5_Labels_for_participants_no_Boundary.zip
├── assess_classification_reference_implementation.tgz

where only 2_Ortho_RGB.zip and 5_Labels_all.zip are needed.

1
2
3
Potsdam
├── 2_Ortho_RGB.zip
├── 5_Labels_all.zip

2_Ortho_RGB.zip 中的图片为 tif 格式,Windows 自带的各种图片工具都不能正常打开,使用 vscode 中 tif 插件,例如 TIFF Preview,可以查看 Potsdam 数据集的 tif 原图。此外 Potsdam 数据集的原图存在扭曲现象,这是数据集本身的问题,不是处理的失误。

Correspondence between colors and categories

0[255,255,255]whiteimpervious surfaces1[0,0,255]bluebuilding2[0,255,255]cyanlow vegetation3[0,255,0]greentree4[255,255,0]yellowcar5[255,0,0]redclutter/background\begin{array}{cclcl} 0 & \colorbox{white}{$\quad$} & [255, 255, 255] & \text{white} & \text{impervious surfaces}\\ 1 & \colorbox{blue}{$\quad$} & [0, 0, 255] & \text{blue} & \text{building}\\ 2 & \colorbox{cyan}{$\quad$} & [0, 255, 255] & \text{cyan} & \text{low vegetation}\\ 3 & \colorbox{green}{$\quad$} & [0, 255, 0] & \text{green} & \text{tree}\\ 4 & \colorbox{yellow}{$\quad$} & [255, 255, 0] & \text{yellow} & \text{car}\\ 5 & \colorbox{red}{$\quad$} & [255, 0, 0] & \text{red} & \text{clutter/background}\\ \end{array}

1
2
3
4
5
6
7
8
9
10
'''
0: [255 255 255] : white : impervious surface
1: [ 0 0 255] : blue : building
2: [ 0 255 255] : cyan : low vegetation
3: [ 0 255 0] : green : tree
4: [255 255 0] : yellow : car
5: [255 0 0] : red : clutter/background
'''
color_map = np.array([[255, 255, 255], [ 0, 0, 255], [ 0, 255, 255],
[ 0, 255, 0], [255, 255, 0], [255, 0, 0]])

注意如果使用的是 5_Labels_all_noBoundary.zip 作为标签,其包含了边界标注,对应的 color_map 会有所不同

1
2
3
4
5
6
7
8
9
10
11
12
'''
0: [ 0 0 0] : black : boundary
1: [255 255 255] : white : impervious surface
2: [ 0 0 255] : blue : building
3: [ 0 255 255] : cyan : low vegetation
4: [ 0 255 0] : green : tree
5: [255 255 0] : yellow : car
6: [255 0 0] : red : clutter/background
'''
color_map = np.array([[0, 0, 0], [255, 255, 255], [0, 0, 255],
[0, 255, 255], [0, 255, 0], [255, 255, 0],
[255, 0, 0]])

Configuration

Use the code below to convert the original images (pixels 6000×6000) to patches (pixels 512×512)

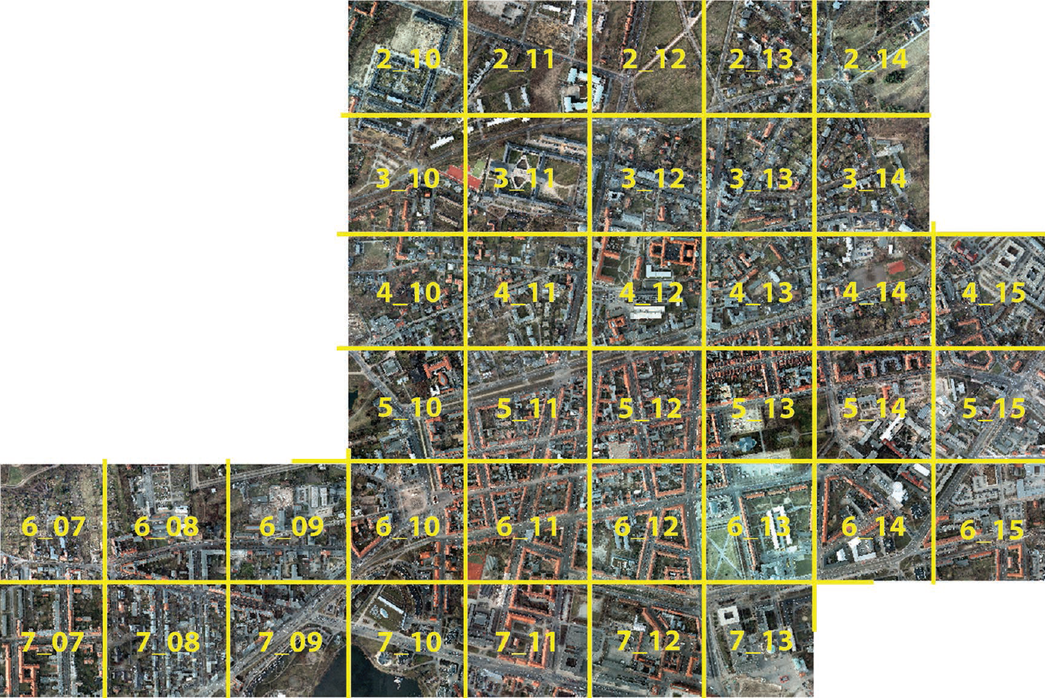
In the 2_Ortho_RGB.zip file, it contains 38 pictures of size 6000x6000:

Potsdam

In the default configuration, We assign the training, validation, and test sets as follows, 21 for training, 1 for validation and 14 for testing

1
2
3
4
5
6
7
8
9
10
11
12
13
14
splits = {
'train': [
'2_11', '2_12', '3_10', '3_11', '3_12', '4_10', '4_11',
'5_10', '5_11', '5_12', '6_8', '6_9', '6_10', # '4_12', '6_7',
'6_11', '6_12', '7_7', '7_8', '7_9', '7_10', '7_11', '7_12'
],
'val': [
'2_10'
],
'test': [
'2_13', '2_14', '3_13', '3_14', '4_13', '4_14', '4_15', '5_13',
'5_14', '5_15', '6_13', '6_14', '6_15', '7_13'
]
}

where there is a problem with the label images for 4_12 and 6_7, so we discard them.

And every picture will be seplited into 12x12=144 patches of size 512x512. There are (38-2)x144=5184=3024+144+2016 patches in total, in which 21 images / 3024 patches are used for training, 1 image / 144 patches for velidation and 14 images / 2016 patches for testing.

For an image with size 6000x6000 and patch_size 512, 6000 = 11×512+368 = 12×512-144, which are not divisible, we split 6000 with 512 as follows:

1
2
x/ymin: [0, 512, 1024, 1536, 2048, 2560, 3072, 3584, 4096, 4608, 5120, 5632]
offset: [0, 0, 0, 0, 0, 0, 0, 0, 0, 0, 0, -144]
1
2
0~512, 512~(2*512), (2*512)~(3*512), ..., (10*512)~(11*512), (11*512-144)~(12*512-144)
0~512, 512~1024, 1024~1563, ..., 5120~5632, 5488~6000
1
2
3
4
5
6
7
8
9
10
11
12
13
14
15
+----------------------------------------------------------------------------------------+
| x+offset, y+offset, x+offset+512, y+offset+512 |
+-----------------+--------------------+-----+---------------------+---------------------+
| 0_0_512_512 | 512_0_1024_512 | ... | 5120_0_5632_512 | 5488_0_6000_512 |
+-----------------+--------------------+-----+---------------------+---------------------+
| 0_512_512_1024 | 512_512_1024_1024 | ... | 5120_512_5632_1024 | 5488_512_6000_1024 |
+-----------------+--------------------+-----+---------------------+---------------------+
| 0_1024_512_1536 | 512_1024_1024_1536 | ... | 5120_1024_5632_1536 | 5488_1024_6000_1536 |
+-----------------+--------------------+-----+---------------------+---------------------+
| : | : | | : | : |
+-----------------+--------------------+-----+---------------------+---------------------+
| 0_5120_512_5632 | 512_5120_1024_5632 | ... | 5120_5120_5632_5632 | 5488_5120_6000_5632 |
+-----------------+--------------------+-----+---------------------+---------------------+
| 0_5488_512_6000 | 512_5488_1024_6000 | ... | 5120_5488_5632_6000 | 5488_5488_6000_6000 |
+-----------------+--------------------+-----+---------------------+---------------------+

Potsdam 数据集中的错误

错误来源于 potsdam 数据集本身的两张 label。第一张是 top_potsdam_6_7_label.tif 包含了错误的像素值

1
2
3
4
5
6
7
8
9
from PIL import Image
import numpy as np

mask_path = 'path/to/top_potsdam_6_7_label.tif'

mask = Image.open(mask_path)
mask = np.array(mask).reshape(-1,3)
values, counts = np.unique(mask, return_counts=True, axis=0)
print(values, counts)

通过python统计 top_potsdam_6_7_label.tif 的像素输出结果如下

1
2
3
4
5
6
7
8
9
10
# values
[[ 0 0 255]
[ 0 255 0]
[ 0 255 255]
[252 255 0] # <-- Error
[255 0 0]
[255 255 0]
[255 255 255]]
# counts
[ 4857912 5669942 19962121 246304 797467 6749 4459505]

输出中包含 2 个 list,上面的 list 为 rgb 颜色值,下面为各颜色对应的像素数。注意 6_7 包含了一类非正常的 rgb 值 [252, 255, 0],其中第一个值是 252 并非 255,这个 rgb 值在为像素打 label 时造成了错误,所以可以将这个 252 改成 255 即可。

第二张错误 label 是 top_potsdam_4_12_label.tif,这张图片不正常,其像素标注值非常混乱

1
2
3
4
5
6
7
8
9
from PIL import Image
import numpy as np

mask_path = '../datasets/original_potsdam/label/top_potsdam_4_12_label.tif'

mask = Image.open(mask_path)
mask = np.array(mask).reshape(-1,3)
values, counts = np.unique(mask, return_counts=True, axis=0)
print(len(values)) # 24850 <-- Not Six Classes

从输出结果可以看到,它包含 24850 种 RGB 颜色值,它的像素标签值非常混乱,我们将它舍去。

Split Code

Prepare Dataset: ISPRS-Potsdam | mmsegmentation doc

tools/dataset_converters/potsdam.py | mmsegmentation github

1
2
3
4
# potsdam
# ├── 2_Ortho_RGB.zip
# ├── 5_Labels_all.zip
python path\to\potsdam.py path\to\potsdam
1
2
3
4
5
6
7
8
9
10
11
12
13
14
15
16
17
18
19
20
21
22
23
24
25
26
27
28
29
30
31
32
33
34
35
36
37
38
39
40
41
42
43
44
45
46
47
48
49
50
51
52
53
54
55
56
57
58
59
60
61
62
63
64
65
66
67
68
69
70
71
72
73
74
75
76
77
78
79
80
81
82
83
84
85
86
87
88
89
90
91
92
93
94
95
96
97
98
99
100
101
102
103
104
105
106
107
108
109
110
111
112
113
114
115
116
117
118
119
120
121
122
123
124
125
126
127
128
129
130
131
132
133
134
135
136
137
138
139
140
141
142
143
144
145
146
147
148
149
150
151
152
153
154
155
156
157
158
159
160
161
162
163
164
165
166
167
168
169
170
171
172
173
174
175
176
177
178
179
180
181
182
183
184
185
186
187
188
189
190
191
192
193
194
195
196
197
198
199
200
201
202
203
# ref: https://github.com/open-mmlab/mmsegmentation/blob/main/tools/dataset_converters/potsdam.py
import argparse
import glob
import math
import os
import os.path as osp
import tempfile
import zipfile
from tqdm import tqdm

from PIL import Image
import numpy as np

def get_parser():
parser = argparse.ArgumentParser(
description='Convert potsdam dataset to mmsegmentation format')
parser.add_argument('dataset_path', help='potsdam folder path')
parser.add_argument('--tmp_dir', help='path of the temporary directory')
parser.add_argument('-o', '--out_dir', help='output path')
parser.add_argument(
'--clip_size',
type=int,
help='clipped size of image after preparation',
default=512)
parser.add_argument(
'--stride_size',
type=int,
help='stride of clipping original images',
default=256)
# args = parser.parse_args(arg_list)
return parser

def clip_big_image(image_path, clip_save_dir, args, to_label=False):
'''
Original image of Potsdam dataset is very large, thus pre-processing
of them is adopted. Given fixed clip size and stride size to generate
clipped image, the intersection of width and height is determined.
For example, given one 5120 x 5120 original image, the clip size is
512 and stride size is 256, thus it would generate 20x20 = 400 images
whose size are all 512x512.
'''
image = Image.open(image_path)
image = np.array(image)

h, w, c = image.shape # 6000, 6000, 3
clip_size = args.clip_size # 512
stride_size = args.stride_size # 256

num_rows = math.ceil((h - clip_size) / stride_size) \
if math.ceil((h - clip_size) / stride_size) * stride_size + clip_size >= h \
else math.ceil((h - clip_size) / stride_size) + 1
num_cols = math.ceil((w - clip_size) / stride_size) \
if math.ceil((w - clip_size) / stride_size) * stride_size + clip_size >= w \
else math.ceil((w - clip_size) / stride_size) + 1005

x, y = np.meshgrid(np.arange(num_cols + 1), np.arange(num_rows + 1))
xmin = x * clip_size
ymin = y * clip_size

xmin = xmin.ravel()
ymin = ymin.ravel()
xmin_offset = np.where(xmin + clip_size > w, w - xmin - clip_size,
np.zeros_like(xmin))
ymin_offset = np.where(ymin + clip_size > h, h - ymin - clip_size,
np.zeros_like(ymin))
boxes = np.stack([
xmin + xmin_offset, ymin + ymin_offset,
np.minimum(xmin + clip_size, w),
np.minimum(ymin + clip_size, h)
], axis=1)

if to_label:
# color_map = np.array([[0, 0, 0], [255, 255, 255], [255, 0, 0],
# [255, 255, 0], [0, 255, 0], [0, 255, 255],
# [0, 0, 255]])
# color_map = np.array([[0, 0, 0], [255, 255, 255], [0, 0, 255],
# [0, 255, 255], [0, 255, 0], [255, 255, 0],
# [255, 0, 0]])
'''
0: [255 255 255] : impervious surfaces
1: [ 0 0 255] : building
2: [ 0 255 255] : low vegetation
3: [ 0 255 0] : tree
4: [255 255 0] : car
5: [255 0 0] : clutter/background
'''
color_map = np.array([[255, 255, 255], [0, 0, 255], [0, 255, 255],
[0, 255, 0], [255, 255, 0], [255, 0, 0]])

flatten_v = np.matmul(
image.reshape(-1, c),
np.array([2, 3, 4]).reshape(3, 1))
out = np.zeros_like(flatten_v)
for idx, class_color in enumerate(color_map):
value_idx = np.matmul(class_color,
np.array([2, 3, 4]).reshape(3, 1))
out[flatten_v == value_idx] = idx
image = out.reshape(h, w)

for box in boxes:
start_x, start_y, end_x, end_y = box
clipped_image = image[start_y:end_y,
start_x:end_x] if to_label else image[
start_y:end_y, start_x:end_x, :]
idx_i, idx_j = osp.basename(image_path).split('_')[2:4]

# The original way of saving images, but it takes too much of time to save clipped images in this way.
# mmcv.imwrite(
# clipped_image.astype(np.uint8),
# osp.join(
# clip_save_dir,
# f'{idx_i}_{idx_j}_{start_x}_{start_y}_{end_x}_{end_y}.png'))

clipped_image = Image.fromarray(clipped_image.astype(np.uint8))
clipped_image.save(
fp=osp.join(clip_save_dir, f'{idx_i}_{idx_j}_{start_x}_{start_y}_{end_x}_{end_y}.png'),
format='PNG', compress_level=1
)
# 'data\\potsdam\\img_dir\\train'


def main():
parser = get_parser()
args = parser.parse_args(["/home/zwx/deeplearning/datasets_package/potsdam",
"--tmp_dir", "/dev/shm",
"--clip_size", "224", "--stride_size", "224"])
splits = {
'train': [
'2_11', '2_12', '3_10', '3_11', '3_12', '4_10', '4_11',
'5_10', '5_11', '5_12', '6_8', '6_9', '6_10', # '4_12', '6_7',
'6_11', '6_12', '7_7', '7_8', '7_9', '7_10', '7_11', '7_12'
],
# there is a problem with the label images for 4_12 and 6_7, so we discard them.
'val': [
'2_10'
],
'test': [
'2_13', '2_14', '3_13', '3_14', '4_13', '4_14', '4_15', '5_13',
'5_14', '6_13', '6_14', '6_15', '7_13'
]
}

dataset_path = args.dataset_path
if args.out_dir is None:
out_dir = osp.join('data', 'potsdam') # 'data\\potsdam'
else:
out_dir = args.out_dir

print('Making directories...')
if not osp.exists(osp.join(out_dir, 'img_dir', 'train')):
os.makedirs(osp.join(out_dir, 'img_dir', 'train'))
if not osp.exists(osp.join(out_dir, 'img_dir', 'val')):
os.makedirs(osp.join(out_dir, 'img_dir', 'val'))
if not osp.exists(osp.join(out_dir, 'img_dir', 'test')):
os.makedirs(osp.join(out_dir, 'img_dir', 'test'))

if not osp.exists(osp.join(out_dir, 'ann_dir', 'train')):
os.makedirs(osp.join(out_dir, 'ann_dir', 'train'))
if not osp.exists(osp.join(out_dir, 'ann_dir', 'val')):
os.makedirs(osp.join(out_dir, 'ann_dir', 'val'))
if not osp.exists(osp.join(out_dir, 'ann_dir', 'test')):
os.makedirs(osp.join(out_dir, 'ann_dir', 'test'))

zipp_list = glob.glob(os.path.join(dataset_path, '*.zip'))
print('Find the data', zipp_list)
# ['D:/Dataset/Potsdam\\2_Ortho_RGB.zip',
# 'D:/Dataset/Potsdam\\5_Labels_all_noBoundary.zip']

for zipp in zipp_list:
with tempfile.TemporaryDirectory(dir=args.tmp_dir) as tmp_dir: # tmp_dir changes in every loop if dir=None
zip_file = zipfile.ZipFile(zipp)
zip_file.extractall(tmp_dir)
# Check whether the *.tif files are unziped to current directory or a sub directory
src_path_list = glob.glob(os.path.join(tmp_dir, '*.tif'))
# if len(src_path_list)==0, it means *.tif are extracted to a sub directory rather than current directory directly
if not len(src_path_list):
sub_tmp_dir = os.path.join(tmp_dir, os.listdir(tmp_dir)[0])
src_path_list = glob.glob(os.path.join(sub_tmp_dir, '*.tif'))

prog_bar = tqdm(src_path_list)
for src_path in prog_bar:
idx_i, idx_j = osp.basename(src_path).split('_')[2:4] # e.g.'top_potsdam_2_10_RGB.tif'.split('_')[2:4]
# data_type = 'train' if f'{idx_i}_{idx_j}' in splits[
# 'train'] else 'val'
if f'{idx_i}_{idx_j}' in splits['train']:
data_type = 'train'
elif f'{idx_i}_{idx_j}' in splits['val']:
data_type = 'val'
else:
data_type = 'test'

if 'label' in src_path:
dst_dir = osp.join(out_dir, 'ann_dir', data_type)
clip_big_image(src_path, dst_dir, args, to_label=True)
else:
dst_dir = osp.join(out_dir, 'img_dir', data_type) # 'data\\potsdam\\img_dir\\train'
clip_big_image(src_path, dst_dir, args, to_label=False)

print('Removing the temporary files...')
print('Done!')

if __name__ == '__main__':
main()

mmsegmentation potsdam.py 代码中的 color_map

源代码见链接 potsdam.py | github,下面的代码块是截取的 color_map 部分

mmsegmentation 源码中对 color_map 的设置为 BGR,与正常的 RGB 正好相反,这一点需要注意。

1
2
3
4
5
6
7
8
9
# mmsegmentation 的 color_map 颜色顺序为 BGR
color_map = np.array([[0, 0, 0], [255, 255, 255], [255, 0, 0],
[255, 255, 0], [0, 255, 0], [0, 255, 255],
[0, 0, 255]])

# 正常颜色顺序应该为 RGB
color_map = np.array([[0, 0, 0], [255, 255, 255], [0, 0, 255],
[0, 255, 255], [0, 255, 0], [255, 255, 0],
[255, 0, 0]])

mmsegmentation 之所以标注 BGR 的颜色顺序,应该是其 imread 和 imwrite 方法的底层调用了 cv2 的 imread 和 imwrite,或者模仿了它们的设计。这里可以参考一下这篇博客 cv2如何处理RGB和BGR | 文羊羽

  • mmsegmentaion 的 color map, BGR

    1
    2
    3
    4
    5
    6
    7
    0: [  0   0   0] : boundary
    1: [255 255 255] : impervious surfaces
    2: [255 0 0] : background
    3: [255 255 0] : car
    4: [ 0 255 0] : tree
    5: [ 0 255 255] : low vegetation
    6: [ 0 0 255] : building
  • 正常的 color map, RGB

    1
    2
    3
    4
    5
    6
    7
    0: [  0   0   0] : boundary
    1: [255 255 255] : impervious surfaces
    2: [ 0 0 255] : building
    3: [ 0 255 255] : low vegetation
    4: [ 0 255 0] : tree
    5: [255 255 0] : car
    6: [255 0 0] : clutter/background